social

Darling Angel Christmas Ornament


Silver Post Medal for All Time! 408 Posts
August 23, 2015

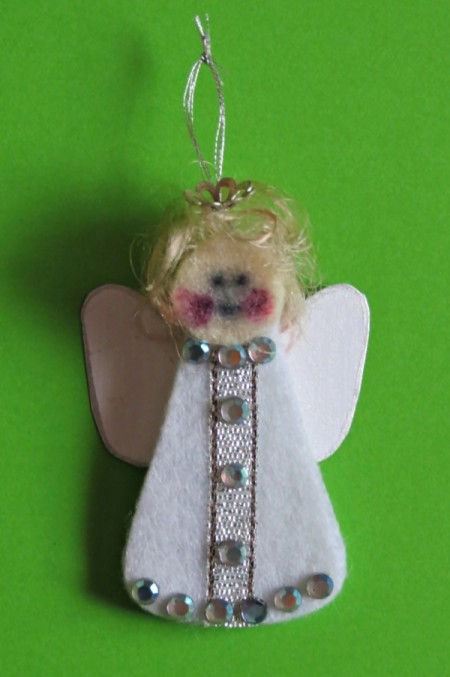
finished Angel ornamentThe countdown to Christmas has begun! What better way to start getting into the spirit of the season than by starting to make your decorations. Make this little angel to decorate your tree this year. She is quick and inexpensive to make, so make ten, make twenty, no! Make enough to decorate your whole tree with these cute little angels!

Advertisement

Total Time: 10 minutes

Yield: one angel

Supplies:

  • provided pattern sheet
  • A6 sized white felt
  • A7 sized flesh colored felt
  • A7 sized white shimmer cardstock
  • 12 4mm clear flat-sided rhinestone stickers
  • 1 8mm silver torus bead cap
  • curly blonde synthetic doll hair
  • 3 in of 0.2" wide silver metallic ribbon
  • fine silver embroidery thread
  • clear drying craft glue (such as Bostik Clear)
  • Pilot silver marker pen
  • Artline 210 medium Fineliner Pen
  • dark pink felt-tip pen
  • standard scissors
  • pencil
  • needle
Angel Ornament template
 

Steps:

  1. Trace two body parts onto the white felt and cut them out. Use glue to affix the two parts together.
  2. Glue a strip of silver ribbon down the front of the angel's dress and cut off any protruding edges.
  3. Cut one face from the flesh colored felt. Glue the face onto the angel's head.
  4. Advertisement

  5. You need to be able to hang the angel from the tree. Put a piece of silver thread through the needle's eye and double it up. Stick the needle through the top of the angel's head and tie a knot a few inches away from the top of the angel's head. Neatly cut off the ends of the thread.
  6. Glue the angel's hair in place and cut it neatly around her face.
  7. Use the Fineliner Pen to add eyes and a mouth.
  8. Add rosy cheeks using the dark pink pen.
  9. Use rhinestones to decorate the collar and seam of the dress. Also add rhinestones on the ribbon.
  10. Trace one pair of wings onto the shimmer cardstock and cut it out. Use the Pilot pen to add a silver border all around the wings. Do this on the front and back sides of the wings.
  11. Use the bead cap to give the angel a little crown.
  12. Darling Angel Christmas Ornament
     
    Advertisement

Comment Pin it! Was this helpful? 5
In These Pages
Categories
Crafts OrnamentsNovember 8, 2018
Pages
More
🎃
Halloween Ideas!
Instagram
Contests!
Newsletters
Ask a Question
Share a Post
Sub-Categories
AdviceBaking TipsBooksBoxing DayBudgetCardsCharitiesChristmas RecipesCleaningCooking TipsCraftsDecoratingDietingGamesGift WrappingGiftsHelpful HintsHosting TipsLinksMiscellaneousMy Frugal HolidayOrganizationParentingPartiesPhotosPlanningSanta TipsShoppingStocking StuffersTraditionsTravel
Published by ThriftyFun.
Desktop Page | View Mobile
Disclaimer | Privacy Policy | Contact Us
Generated 2022-10-12 16:02:56 in 3 secs. ⛅️️
© 1997-2022 by Cumuli, Inc. All Rights Reserved.
https://www.myfrugalchristmas.com/Darling-Angel-Christmas-Ornament-1.html