social

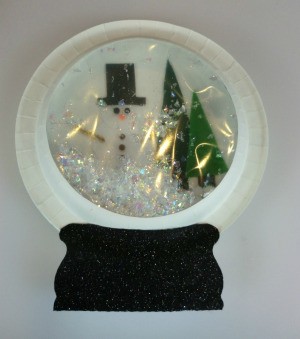
Paper Plate Snow Globe


Gold Post Medal for All Time! 899 Posts

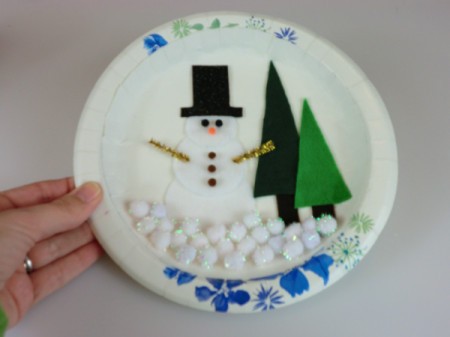
finished snow globe 2I absolutely love homemade Christmas decorations. This is a fun craft that can be easily customized with your favorite holiday scene!

Advertisement

Supplies:

Steps:

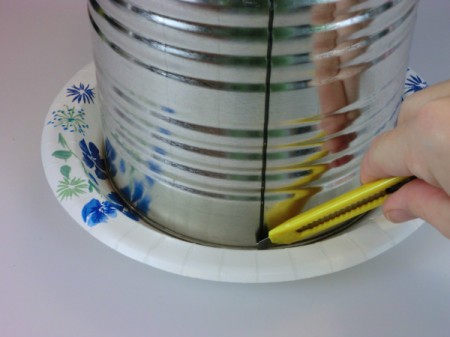
  1. Cut out the center of one of the plates. I used a large tin can to help guide my knife.
  2. cut center out of plate
     
  3. Because my plate had a pattern, I removed the middle from another plate and glued it down, white side up, into the center of my second plate. You may need to roll the edges the other way so that it nests inside the other plate.
  4. cut out plate for white background
     
    glue down white background
     
  5. Cut three circles from the white felt. I found three containers of increasing size to trace around. Cut them out. Now glue them to the plate to form a snowman.
  6. trace circle for snowman
     
    glue on snowman circles
     
    cut out snowman circles
     
    Advertisement

  7. Cut out tree shapes and strips for their trunks from the green and brown felt. Then glue them to the plate.
  8. glue on trees
     
    cut out trees
     
  9. Cut out a hat for the snowman from the black felt. Then glue it onto the snowman's head.
  10. cut out hat
     
    glue on hat
     
  11. Now, decorate your snowman with eyes, a nose, buttons, and arms. You can also add pom poms for snow or any other decorations you want.
  12. decorate snowman 2
     
  13. Cut out a base for your snow globe from the black felt. Lay it at the bottom of the plate to test fit it. Trim it if necessary.
  14. cut out snow globe base
     
    test fir base on plate
     
    Advertisement

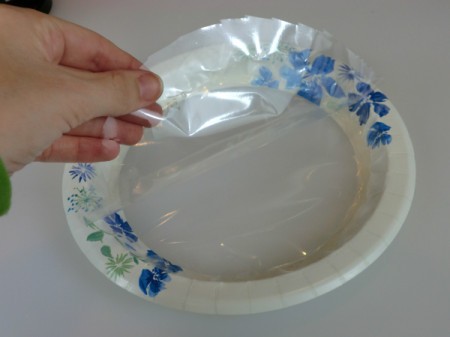
  15. Take the sheet protector and trim it a little bigger than the opening in the center of your plate. Then run a line of glue all the way around the opening and adhere the sheet protector. Be sure to smooth it out as you glue so that it isn't wrinkled.
  16. trim page protector
     
    glue page protector to plate
     
  17. You should now have a flap that isn't glued down. Run a line of glue around the edge again, leave one small opening at the top.
  18. flap of plastic
     
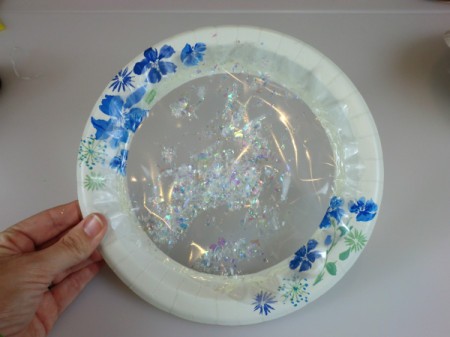
  19. Once the glue is dry, carefully pour the glitter into the opening, between the two sheets of plastic. Then glue the opening shut.
  20. add glitter or fake snow
     
    Advertisement

  21. Run a line of glue along the outer edge of one plate and adhere it to the other one. Finally, glue the base onto the bottom edge of the snow globe. You can punch a hole in the top and use ribbon to hang it up if you want!

Add your voice! Click below to comment. ThriftyFun is powered by your wisdom!


Bronze Feedback Medal for All Time! 135 Feedbacks
December 12, 20120 found this helpful

This is so cute! How creative... and it can even be shaken. Ü

 
December 15, 20120 found this helpful

This is really cool! Sometimes you need a larger decoration such as this to fill up an area. I might try this for my cubicle this year!

Advertisement

This would work well in a school or office. Thanks so much for sharing your idea!


Add your voice! Click below to comment. ThriftyFun is powered by your wisdom!

 
In This Page
< Previous
Categories
Crafts DecorationsDecember 12, 2012
Pages
More
🎆
Fourth of July Ideas!
👔
Father's Day Ideas!
🌻
Gardening
Instagram
Sub-Categories
AdviceBaking TipsBooksBoxing DayBudgetCardsCharitiesChristmas RecipesCleaningCooking TipsCraftsDecoratingDietingGamesGift WrappingGiftsHelpful HintsHosting TipsLinksMiscellaneousMy Frugal HolidayOrganizationParentingPartiesPhotosPlanningSanta TipsShoppingStocking StuffersTraditionsTravel
Published by ThriftyFun.
Desktop Page | View Mobile
Disclaimer | Privacy Policy | Contact Us
Generated 2024-05-29 11:40:32 in 3 secs. ⛅️️
© 1997-2024 by Cumuli, Inc. All Rights Reserved.
https://www.myfrugalchristmas.com/Paper-Plate-Snow-Globe-2.html