Harlean
Bronze Post Medal for All Time! 148 Posts Materials and tools needed:
- 5 wooden spoons all the same size
- small amounts of felt: red, white, & brown
- pompoms 4-1 inch white, 1 1/2inch Brown, 3/4 inch Red
- short piece of floral wire or chenille stem
- narrow red ribbon and half inch ribbon
- glitter glue or other trim for saddle blanket
- 2 small jingle bells
- 12 mm wiggly eyes (Glue on)
- 1/2 inch eyelashes
- small bottle of light brown acrylic paint
- small bottle of black acrylic paint
- hot glue and glue gun
- small holly leaves for trim on ears
Instructions:
- Measure about 9 inches from tip of spoon towards end of handle and cut 4 spoons this size.
- For the remaining spoon, measure 4 and a half inches from tip of spoon and cut for the head and neck.
- Cut another piece from the handle of that spoon 4 and a half inches long for the back of the deer.
- Stain all spoon pieces with the light brown paint diluted with water to thin it down. About 1 part water to 1 part paint should work. Let them dry.
- Glue the 4 spoon legs to the back piece with the spoon bowls facing in. Make sure they allow your deer to stand level. Optional step: cut 2 and a quarter inch pieces of the remaining handle and glue between the spoons (front and back) just below the back piece to stabilize the legs with a little extra support. Glue the head spoon to the end of the back piece.
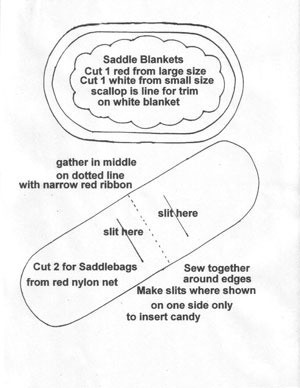
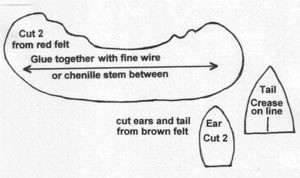
- Make cardboard templates for all the felt pieces, and trace them onto the felt and cut out.
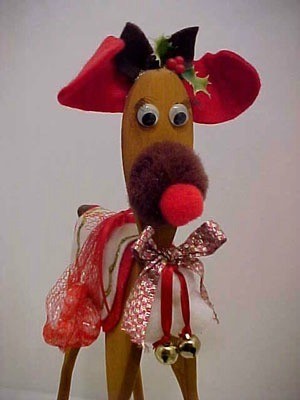
- Assemble the red antlers with the wire or chenille stem glued between them. This will allow you to shape them once they are in place. You can curl the edges a little forward as in the photo.
- Assemble the head. Using the picture as a guide, with bowl of spoon facing the tail end, glue the brown pompom to the head spoon for the nose. Glue the red pompom to the front of the brown pompom. Glue eyelashes and eyes in place. Crease the ears slightly on the straight edge and glue in place. Glue antlers behind the ears. Add a little holly for accent just in front of the left ear.
- Glue a white pompom to the tail end and glue the brown felt tail above it, making a slight crease on the flat edge. Glue 3 white pompoms to the front of the deer in a triangular shape. Make a bow with half inch ribbon of your choice and glue to neck above pompoms. Attach the jingle bells to each end of a piece of narrow ribbon, and tie around his neck, so the bells will dangle in front of his chest. Trim the white part of the two piece saddle blanket. If you want to use glitter glue, you can follow the scalloped design shown, or you can use trim of your choice, such as rickrack or colored cord.
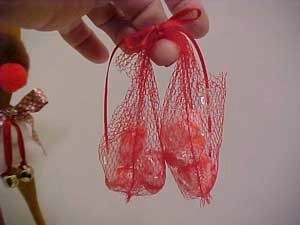
- To make the saddle bags, cut two pieces from nylon net. Sew them together. Gather them in the middle by tying tightly with a narrow ribbon. Then cut a slit on either side of the ribbon, cutting only through one side just large enough to insert a couple tiny candy canes or peppermint drops. Drape the saddlebags over the back of the deer. With black paint, paint about half an inch up on his legs for hooves.
Click on the pattern images below (at the end) for a size large enough to print.
By Harlean from Hot Springs, AR
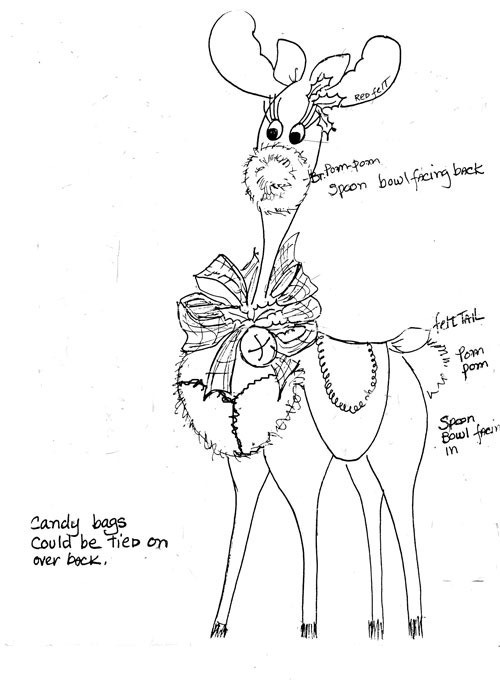


Click on Image for Larger Size Pattern to Print

Add your voice! Click below to comment. ThriftyFun is powered by your wisdom!

suzanne
Silver Post Medal for All Time! 277 Posts December 6, 20061 found this helpful
very,very cute !! thanks you for such good detailed directions
i have a friend who doesn't have a computer and is great at making crafts. so i print them out for her. she will love this one !
By Freedom059 (Guest Post)
February 15, 20070 found this helpful
My daughter and I made these but she changed the antlers from the felt to brown "pipe cleaners" and it turned out very well. Thanks for the idea!

January 7, 20170 found this helpful
I print the pattern but it comes out small. How come?

November 10, 20180 found this helpful
When I click on the pattern it is very small not big enough to use can you tell me the dimension or replace the pattern to the correct size please.
Add your voice! Click below to comment. ThriftyFun is powered by your wisdom!


