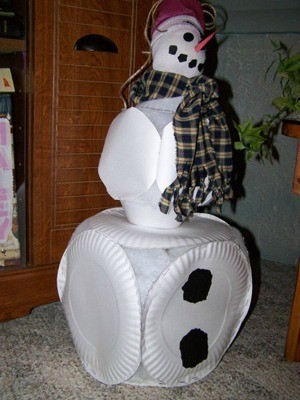
An easy project for kids to make a snowman they can be proud of! Depending on their age they may need a little supervision. I love doing crafts with my grandchildren and constantly have to come up with new things. I came up with this one last night and put it together this morning.
Approximate Time: 1 hour
Supplies:
- (12) 9 inch paper plates
- (2) 6 Styrofoam bowls
- black construction paper
- scrap of orange construction paper
- 2 black buttons or goggle eyes
- 1 men's sock
- 6 inch x 36 inch fabric
- Tacky glue
- hot glue
- quilt batting scraps
- bag of rice (optional)
- jute for hat decoration (optional)
- stapler
- red paint
- scissors
Instructions:
Please read through all directions before starting. The stronger paper plates you use the firmer your snowman, but you won't be able to staple wrong side out. I used the light weight plates so if you look close at mine you can see what it looks like right side to right side. Feel free to tweak it to your liking.
- Take 4 of the paper plates and staple them together, this will be the sides of the bottom ball.
- If you staple them backside-to-backside you will have a more rounded snowman. It may be easier for the kids if you mark the four sides with pencil.
- Staple two plates together for the bottom for strength, now glue something white such as paper towel or quilt batting to cover the holes in the corners.
- Glue batting on the topside corners also, leaving plenty so you can glue it to hide the holes when you attach the top plates. Attach your top two plates then reach in and glue the batting. (Forget the batting to fill the holes if you want.)
- You want the second snowball smaller so as shown in the next photo cut the rim down on 4 plates. You will use two Styrofoam bowls for the top and bottom of this ball. Repeat the stapling and batting process the same as on the bottom ball. Using hot glue center and glue this ball to the bottom ball.
- For the head I took a lonely big sock, stuffed half or so of the toe end with batting and tied it off with string. I then pulled the top of the sock down over the stuffed toe as in the picture and spray painted the inside out part red for the snowman cap. You might want to slip a plastic bag over the stuffed head part to protect it from spray. Let it dry and turn up the cuff of the sock an inch or so for the cuff of the cap.
- Scrunch the cap up to fit like you want it and hot glue or stitch your cap in place.
- Make a jute bow or whatever you want for his/her cap and attach it before hot gluing the head to the second ball.
- To keep it simple for kids I tore construction paper for the coal mouth and buttons. I glued buttons on for the eyes, but you could use goggle eyes.
- For the carrot nose cut two triangles at one end to a point away. (see photo) Fold both in half and sandwich one inside the other to make the carrot nose. Scrunch some folds in for character perhaps. Put a good portion of hot glue on where the nose goes and attach the hose holding it until it is firm.
- Tie a scarf out of a scrap of fabric around the neck and you have a paper plate snowman.
Remember the point of this craft project is to have fun with the kids. It doesn't matter how it looks as long as they have fun with it.
By Ann Winberg from Loup City, NE

